AGRIS Customer Documentation
AGRIS 20.2.0 Installation Instructions
- Dan Sudduth
- Mike Terning
- Iegor Gutyria (Unlicensed)

Click here to go back to the Technical Info page
Table of Contents
Change Log
Version | Type | Change Description |
|---|---|---|
20.2.0 | General | Document created for the instructions to install AGRIS Version 20.2.0 |
Introduction
Purpose
The Installation Instructions assist you in performing new software installations of the AGRIS System Version 20.2.0 software. Also use these instructions to upgrade AGRIS System Version 9.5.0 to this new version.
For information regarding running AGRIS on Microsoft SQL Server, please refer to the documentation here: AGRIS on Microsoft SQL Server
IMPORTANT: Before upgrading your system to AGRIS 20.2.0, read Appendix H – Tips, Known Issues, and Best Practices IMPORTANT: Installing or upgrading AGRIS requires up to two (2) system restarts on all server and client machines, as detailed below. Please take this into consideration when planning your installation or upgrade. 1. A system restart after completing the .NET Framework installation program (this installation program will only run if the computer does not yet have the required version of the .NET Framework) 2. A system restart after completing the AGRIS installation program |
Summary of Major System Requirements
The following table summarizes the major hardware (HW) and software (SW) requirements changes relating to the maintenance and support of AGRIS 20.2.0 (compared to the previous release of AGRIS).
Requirement | Added | Removed |
|---|---|---|
HW-Hard-Drive | No changes. | No changes. |
HW-RAM | No changes.* | No changes. |
HW-CPU | No changes. | No changes. |
SW – AGRIS Dataset Conversions | No changes. | No changes. |
SW-Database Engine | Actian® Zen™ v14 SP1 (Build 14.10.035) | No changes. |
SW-Database File Format | No changes. | No changes. |
SW-Operating System | No changes. | No changes. |
SW-Application Software | No changes. | No changes. |
SW-Report Component | No changes. | No changes. |
SW- Terminal Server | No changes. | No changes. |
*The installation utility checks for at least 512MB of RAM and quits if this amount is not met.
Upgrading From Previous Versions of AGRIS
Note:If you are upgrading from AGRIS Version 9.4.6.x or earlier, please contact Greenstone Technical Support (800-366-2474). Conversions from V9.4.6.x or earlier are not supported in this upgrade.
New as of V9.6.0.0: Retained Settings During Upgrade
The upgrade process in AGRIS retains certain settings from the previous version of AGRIS (such as the settings in the Agris.ini, the Installation Type, the Distribution Folder path, and the COM+ user credentials). During an upgrade installation, the installation process will skip the windows in the Installation Wizard for the retained settings since it already has that information.
If you do not want to retain your settings from the previous version of AGRIS, you can manually uninstall the previous version of AGRIS in Add/Remove Programs or the Program Manager prior to starting the AGRIS installation.
New as of V9.6.0.0: Relocation of the AGRIS startup executable
The following message will appear when upgrading from a version previous to 9.6.0.0. Please read the message carefully. Click the No button to exit the installation process. Click the Yes button to proceed with the installation process. 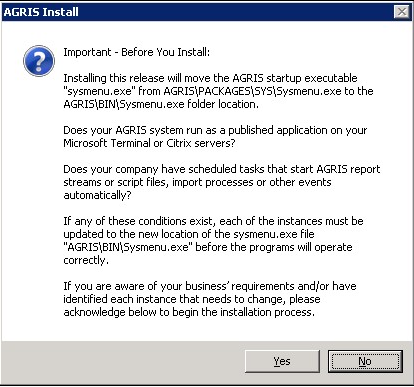
Removing the prior version of AGRIS
When performing upgrades, the following messages may appear. Click Yes to remove the older version of AGRIS during the upgrade. 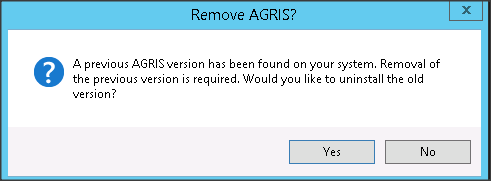
The Remove AGRIS Message 
The Remove AGRIS Client? Message 
The Remove AGRIS Server Components Message 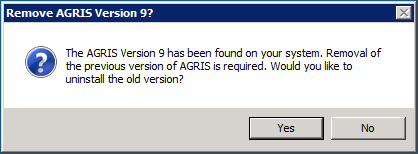
The Remove Previous Version Window
Note: The following screen may appear when removing the previous AGRIS Server components. Click Yes to remove the existing COM+ applications.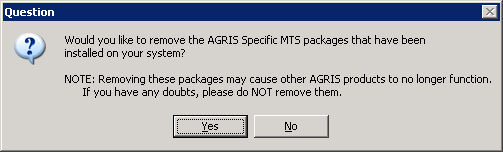
The Remove AGRIS Specific MTS Packages Message
RetailWise Customers
RetailWise customers cannot upgrade directly to AGRIS 20.2.0 and must coordinate their upgrade to Store Manager ES and AGRIS 20.2.0 with the Sales Team (800-393-0075). The AGRIS Integration Platform (AIP) for RetailWise, which is translates data between RetailWise and AGRIS, is not supported in AGRIS 9.5.0.7 and higher. Note that customers already running Store Manager ES are not impacted by this and are able to upgrade to AGRIS 20.2.0.
Tips for Minimizing Downtime During the Installation
Multiple client installations can run simultaneously.
- From a client machine, browse out to the UNC path of the Agrisdist folder
- Please refer to Appendix A for help on determining your Agrisdist UNC path.
- Perform at least the first dataset conversions on the server.
Known Installation Issues
- When uninstalling AGRIS, a message may appear indicating "An error occurred while trying to uninstall AGRIS. It may have already been uninstalled. Would you like to remove AGRIS from the Program and Features list?"
Resolution: Click the No button on this message to proceed with the uninstall.
Pervasive SQL Database File Format Conversion
Upgrading from Previous PSQL Versions
AGRIS requires you to pre-install Pervasive® PSQL™ to manage dataset operations. Please follow the instructions at
https://culturana.force.com/s/article/ka036000000oLocAAE/AGRIS-Installing-Actian-PSQL-v12-SP1-and-Update-3?r=1
System Requirements
Please:
- Consult the System Requirements document before continuing to install AGRIS.
- Verify that all computers meet or exceed the minimum system requirements.
- Where this document refers to "Pervasive® PSQL™", be sure that you are using a supported version of Pervasive® PSQL™ for this version of AGRIS.
Technical Support
Greenstone provides support to all subscribing users of the AGRIS System Version 20.2.0. You can contact our Technical Assistance Center in the following ways:
Email: Mysupport@culturatech.com
Phone: (800) 366-2474
Mail: 3820 Mansell Road, Suite 375. Alpharetta, GA 30022
Website: http://www.greenstonesystems.com/
Knowledge Base https://culturana.force.com/s/login
AGRIS Auto-Update
As a result of many requests for improving the software update process, AGRIS includes a utility for updating AGRIS client computers. This feature, called the AGRIS Auto-Update, assumes the AGRIS users/clients are running AGRIS V9.5.0.27 or greater, any updates made to the Component Server are automatically detected by the system.
Requirements
- You must install the AGRIS System on a separate machine usually referred to as the component server. This type of configuration is usually referred to as a Network Configuration.
- You must install the AGRIS Auto-Update utility via a UNC (Universal Naming Convention) path:
Example: \\servername\sharename\path
- All users must have Administrator privileges for their local computers.
- This feature is not supported on Terminal or Citrix Servers.
- This feature is not supported on Standalone installations.
Description
When you launch AGRIS from a client machine, AGRIS compares its local version to the Component Server version. If an update is detected, it automatically prepares the update application and prompts you to decide whether or not to update the system: 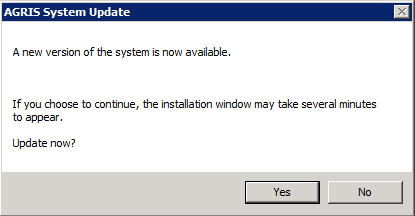
The AGRIS System Update Window
- Launch AGRIS from your Desktop. The installation wizard automatically launches the appropriate update from a network share.
- When the update is complete, you can launch AGRIS without further interruption.
Note: Depending on the state of the system, you may need to restart your workstation following the update.
Procedure
Note: AGRIS requires that you specify network locations using UNC paths.
- Create a network share (Example: \\servername\apps\AGRISDIST). All users need Read permissions to this share.
- The network administrator should save all the installation files to this share.
- If an update is available (update.exe), it should be copied to the same folder that contains the setup.exe, which was created in the previous step.
- Install AGRIS Version 20.2.0 or later on all AGRIS servers, for example, component servers, database servers, etc. Also, apply updates, if they exist, for example, update.exe.
- Install AGRIS Version 20.2.0 or later on all your AGRIS workstations. The AGRIS clients are now ready to detect updates from your servers. When you receive an update from AGRIS, you only have to update your Component Server(s) and application server(s). If you have not specifically set up a Component Server(s), then we assume the database server is the Component Server.
AGRIS 20.2.0 Network Installation
Installation Checklist
Print this checklist to assist you in installing AGRIS 20.2.0.
| Step # | Section | Step | |
|---|---|---|---|
1. | Sec 2.2 | Verify your workstations and servers meet or exceed the system requirements and check their compatibility with current hardware requirements. | |
2. | Sec 2.3 | Install any outstanding Windows Service Packs (if necessary). | |
3. | – | Install a supported version of Pervasive® PSQL™ Server on the database server(s) using the instructions available at https://culturana.force.com/s/article/ka036000000oLocAAE/AGRIS-Installing-Actian-PSQL-v12-SP1-and-Update-3?r=1 | |
4. | – | Install a supported version of Pervasive® PSQL™ Client on any AGRIS client workstations, including Citrix or Terminal Servers using the instructions available at https://culturana.force.com/s/article/ka036000000oLocAAE/AGRIS-Installing-Actian-PSQL-v12-SP1-and-Update-3?r=1 | |
5. | Sec 2.5 | Set up a padmin user account. | |
6. | Sec 2.7 | Create a COM+ Services user account. | |
7. | Sec 2.8 | Set up network COM+ access on the AGRIS Server. | |
8. | Sec 2.10 | Set up the AGRIS directory structure and permissions. | |
9. | Sec 2.14 | IMPORTANT! Back up your datasets. | |
10. | – | Stop the Pervasive® PSQL™ services on the AGRIS server. | |
11. | Sec 3 | Manually install AGRIS Server on the database server. | |
12. | Sec 4 | Manually install AGRIS Server on any Citrix Servers/Terminal Servers. | |
13. | Sec 5 | Manually install AGRIS Client on all your workstations. | |
14. | Sec 2.17 | Download and manually install the latest AGRIS Service Pack on the database server and on any Citrix Servers/Terminal Servers. | |
15. | Sec 1.9 | Use the Auto-Update feature to apply the latest service pack to all client workstations. | |
16. | – | Launch AGRIS from a client workstation to create the datasets folder and first database. | |
17. | Sec 10 | Update the licenses file and the extended options | |
19. | Sec 7 | Install any standalone units that use oneWeigh. | |
20. | Sec 2.16 | If necessary, set up Auto Blender configurations to include AGRIS User information. | |
Verify System Requirements
Please consult the AGRIS Version 20.2.0 System Requirements document before proceeding with the install. Please verify that all computers meet or exceed the minimum system requirements.
Note: The AGRIS installation will fail if minimum system requirements are not met.
Active Directory-Integrated Domain Name Service (DNS)
Active Directory-Integrated DNS is a critical piece of the infrastructure, required for the successful operation of AGRIS. The steps below are provided as a reference for installing and configuring DNS correctly:
- Install and configure DNS on the local Domain Controller (Active Directory is required on this server).
- Setup forwarders within DNS (if configuring for internet access).
- Configure the AGRIS database server, as well as all client computers, to use the local DNS server(s).
To set up DNS forwarders on the server:
- Click on Start >> Programs >> Administrative Tools >> DNS.
- Right-click the server and select Properties.
- Click the Forwarders tab.
- Click the Enable Forwarders option to enable the field allow the IP addresses to be entered.
- Enter the primary DNS server (provided by the internet service provider) and click Add.
- Enter the secondary DNS server (provided by the internet service provider) and click Add.
- Click Apply >> OK.
- Close the DNS window.
Setting up the padmin User Account
You must set up a local user account on the Pervasive database server.
Note: The padmin username and password are hard coded in the AGRIS application. As of the release of AGRIS V9.4.1, users can alter the padmin username and password.
The default username and password for the Pervasive Administrator account is not documented for security reasons. Please contact our Technical Assistance Center (800-366-2474) for this information. Once AGRIS is open:
- Click Customize Menu.
- Click Database Security Configuration to display the message: New User and Password must exist on database server and the user must be a member of the local Administrators Group.
- Contact our Technical Assistance Center (800-366-2474) for an access code to enter in the Database Security Configuration window.
- Type the access code in the Access Code field.
- Press Enter or Click OK to display the User Name and Password window.
- Enter the username and password for the Pervasive Administrator account.
- Click Save.
- Exit AGRIS.
When starting AGRIS for the first time, you may encounter some errors, caused by the system not knowing the padmin username and password you have set up. If this occurs:
- Go to Start >> Settings >> Control Panel.
- Open Administrative Tools.
- Open Computer Management.
- Browse to Local Users and Groups and expand.
- Click Users.
- Click Action >> New User or right-click Users and select New User.
- Type a username (Typically padmin). The Full name and Description are optional.
- Type a password.
- Check the following options:
- User cannot change password
- Password never expires
- Click Create, and then Close.
- Right-click the user created in step 7 and click Properties
- Click the Member Of Tab and click Add... and type Administrators then click Check Names followed by OK
- Click OK again
- Close Computer Management, Administrative Tools and Control Panel.
Assigning Log on Rights
If the AGRIS server is also a Domain Controller, then the padmin user account must be a domain user instead of a local user and made a member of the Builtin Administrators group.
Creating a COM+ Services User Account
This user account is used to start the COM+ services. This account needs administrative permissions to the server that the COM+ components are running on.
- Go to Start >> Settings >> Control Panel.
- Open Administrative Tools.
- Open Active Directory Users and Computers.
- Click Users.
- Click Action >> New User or right-click Users and select New User.
- Type a username. (Typically services) The Full name and Description are optional.
- Type a password.
- Check the following options:
- User cannot change password
- Password never expires
- Click Create, and then Close.
- Click the new user account.
- Choose Action >> Properties or right-click the user and select Properties.
- Click the Member Of tab.
- Click Add.
- Browse to and select Administrators.
- Click Add.
- Click OK to add this user to the group.
- Click OK to finish working with this user account.
- Close Active Directory Users and Computers.
Setting up Network COM+ Access
Windows Server 2016, Windows Server 2019
There are no steps needed for Windows Server 2016 and Windows Server 2019. The AGRIS installation enables this feature programmatically by setting the following registry entry.
HKEY_LOCAL_MACHINE\SOFTWARE\Microsoft\COM3
Name: RemoteAccessEnabled
Type: REG_DWORD
Data: 0x00000001 (1)
Windows Server 2012 R2
- On the Component Server, typically the database server, click Start and type "Server Manager", then click on the Server Manager.
- Click on the Local Server in the selection tree.
- Scroll down to the ROLES AND FEATURES section
- In the TASKS dropdown, select Add Roles and Features
- On the Before you begin step, click Next
- On the Select installation type step, select Role-based or feature-based installation and click Next
- On the Select destination server step, ensure your server is selected and click Next
- On the Server Roles step, expand the Application Server option, checkmark COM+ Network Access, and click Next
- On the Features step, click Next
- On the Confirmation step, click Install
- Once the installation is complete, click Close to close the Add Roles and Features Wizard.
Granting Access to Component Services
Windows Server 2012 R2, Windows Server 2016, Windows Server 2019
- On the Component Server, typically the database server, click Start and type "Server Manager", then click on the Server Manager.
- From the Tools menu, select Component Services
- Double-click Component Services >> Computers.
- Right-click My Computer >> Properties.
- Click the Com Security tab.
- Click Edit Limits for the Launch and Activation Permissions.
- Click the Everyone group.
- Check the Remote Launch and Remote Activation options.
- Click OK >> OK.
- Close Component Services.
Creating the Installation and Distribution Folders
Prior to installing AGRIS on the database server, you must create the following folders:
| Apps | This is a shared folder where user rights are assigned. |
| AGRIS | This is the folder under the Apps folder in which the program is installed and where the dataset files reside. |
| Agrisdist | This is the distribution folder under the Apps folder used by the AGRIS Auto-Update Feature to automatically roll out updates to client computers that run AGRIS V9.5.0.27 or greater. This folder must be accessible via a UNC path in order for clients to update correctly. For additional information about the Auto-Update feature, please refer to Section 1.9. |
If choosing folder names other than those specified above, be aware that the name of the directory where the software is installed (typically the AGRIS folder) cannot exceed eight characters.
Review Section 2.11 , below, for detailed information on setting up these folders.
Setting up the Recommended Directory Structure
To set up the installation and distribution folders in accordance with AGRIS standards, please perform the following steps:
Create the Apps folder:
- Double-click My Computer.
- Double-click the drive where the AGRIS data will reside (typically C: unless another, larger partition exists on the server).
- Click File >> New >> Folder.
- Type Apps as the name of the new folder and press [Enter].
- Double-click the Apps folder to open it.
Create the AGRIS folder:
- Click File >> New >> Folder
- Type AGRIS as the name of the new folder and press [Enter].
Create the Agrisdist folder:
- Click File >> New >> Folder
- Type Agrisdist as the name of the new folder and press [Enter].
Assigning Permissions for File Access
There are two levels of security involved with running AGRIS:
- Windows Network Security.
- AGRIS System Security (optional).
This section deals with Windows Network Security. For information on AGRIS System Security, launch AGRIS >> Help >> System Manager Help and search for SYSTEM SECURITY.
Active Directory networks are configured to allow Domain Users to access the AGRIS files:
Note: These are basic instructions for creating a shared folder in Windows. Consult with your system administrator to determine if you should create this share through the Server Manager application.
- Right-click Apps >> Sharing and Security…
- Click "Share this folder".
- Click Permissions>>Add.
- Type Domain Users and click Check Names (Domain Users should now be underlined indicating that this group was successfully located).
- Click OK.
- With Domain Users selected, put a check for Change in the Allow column.
- Click Apply >> OK.
- Click the Security tab >> Add.
- Type Domain Users and click Check Names (Domain Users should now be underlined indicating that this group was successfully located).
- Click OK.
- With Domain Users selected, check the Full Control option in the Allow column.
- Click Apply >> OK.
In environments where access to the data is more tightly controlled, use the following information to restrict access to AGRIS:
Apps Share Permissions:
| Apps Security Permissions:
|
Disabling Offline File Synchronization
Offline File Synchronization, a feature of Windows which enables users to synchronize files between their local workstations and the network, can cause severe problems with database applications. Disable the Offline File Synchronization in the Apps folder to prevent any file synchronization from occurring.
Windows Server 2012 R2, Windows Server 2016, Windows Server 2019
- Double-click My Computer > C: (or the drive where the Apps folder resides).
- Right-click the Apps folder >> Properties
- Click on the Sharing tab
- Click Advanced Sharing… button.
- Click Caching button.
- Click No files or programs from the shared folder are available offline
- Click OK >> OK >> Close
Backing up AGRIS Data
IMPORTANT
|
Backing Up Open Database Files
Occasionally, if users fail to completely exit from AGRIS prior to running the backup routine, the backup software fails to completely back up the AGRIS datasets. Due to the file relationships that AGRIS maintains, the resulting, partially backed up datasets are often not useable if you need to restore the entire dataset.
To minimize this problem, an open file agent, such as Pervasive Backup Agent™, is recommended. Backup Agent increases the chances of a successful backup if files are held open while the backup is running and is compatible with most backup solutions. For additional information about the Pervasive Backup Agent, please contact the Technical Assistance Center (800-366-2474).
Automated Blender Setup
Starting with AGRIS V9.5.0.9, the Automated Blender Setup procedure now requires the assignment of an AGRIS dataset user, which allows the Auto Blender service to log on to and load session information relative to the dataset.
- Stop the Auto Blender services.
- If you have not already done so, convert your first dataset to AGRIS 20.2.0.
- From the AGRIS Main Menu, select AGY >> General Setup >> Automated Controls to display the Automated Blender Setup window.
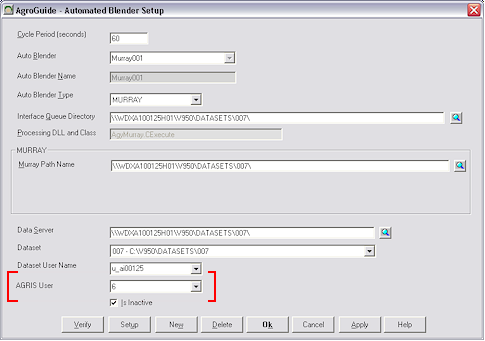
The Automated Blender Setup Window - For each Auto Blender:
- Click the
 button to the right of the Auto Blender field to select an automated blender from the list.
 - Click the button to the right of the AGRIS User field to select a user from the list. Be sure to select an AGRIS user with password permissions set to Never Expire.
- Click Apply to apply the changes.
- Click the
- When you finish assigning users, click OK to close the Automated Blender Setup window.
- Restart the Auto Blender services.
Downloading the AGRIS 20.2.0 Installation Program
- From the console of the server or standalone unit, click Start >> Run…
- Type https://culturana.force.com/ >> click OK.
- Log on to the website
- If you are not already signed up for a user account, you can click the "Register" link to sign up. Account applications are reviewed and approved within 8 business hours.
- Click search for the AGRIS 20.2.0 is Available Article and the Download setup.exe link for AGRIS 20.2.0.
- Click Save when the "Do you want to run or save this file?" message displays.
- On the left side of the window, click Desktop, and then click Save on the bottom, right side to download the update (which may take a few minutes).
- WARNING: Due to enhanced security features in Windows, please ensure that the installer is unblocked prior to installation using the following steps:
- Right-click on the downloaded installation file and click Properties
- At the bottom of the General tab, look for a button that says "Unblock"
- If the button exists, click Unblock and then click OK
- If the button does not exist, click Cancel
- If necessary, you can request an AGRIS 20.2.0 CD from the Technical Assistance Center (800-366-2474) or by emailing Mysupport@culturatech.com.
Configuring Anti-Virus Software
AGRIS is compatible with a variety of anti-virus solutions, but additional configuration reduces the negative performance impact that the real-time anti-virus scanning may cause. Modify your real-time file scanning to exclude the entire AGRIS directory and sub-directories. Failure to configure the anti-virus properly may cause intermittent errors within AGRIS.
Real-time scanning also increases the time needed to install, or update to, AGRIS and PSQL, and may even prevent PSQL from installing. To alleviate both issues, temporarily disable real-time file scanning during the installation.
Please consult the anti-virus documentation for instructions on how to exclude files and folders from the real-time scan and to temporarily disable the real-time file scanning.
Server Installation
AGRIS Server Installation Checklist
Install components in the following order:
AGRIS 20.2.0 Server Installation
This section describes how to install the AGRIS System Version 20.2.0 software in the supported configurations listed in the AGRIS System Requirements document. It assumes that all hardware and supporting software requirements are in place and operational.
The following prerequisites must be satisfied:
Note:The software installation folder name cannot be longer than eight characters.
If this installation is performing a software upgrade from a previous version of the AGRIS Business System, the following prerequisites must also be satisfied:
Note: The existing version of the AGRIS System must be version 9.5.0 or higher. No earlier versions of the software can be directly upgraded to Version 20.2.0.
- Ensure that you have a complete backup of your current version's software and data.
- Purge any unnecessary data files to enhance dataset conversion performance.
Server Installation Procedure
- Installing the .NET Framework:
For Windows Server 2012 R2 and Windows Server 2016 and Windows Server 2019, part of the .NET Framework must be installed through the Server Manager:
Click Start and type "Server Manager", then click on the Server Manager.
Click on the Local Server in the selection tree.
Scroll down to the ROLES AND FEATURES section
In the TASKS dropdown, select Add Roles and Features
On the Before you begin step, click Next
On the Select installation type step, select Role-based or feature-based installation and click Next
On the Select destination server step, ensure your server is selected and click Next
On the Server Roles step:
For Windows Server 2012 R2: checkmark Application Server, click Next
For Windows Server 2016: click Next
On the Features step, checkmark the .NET Framework 3.5 Features option. Checking this will automatically check the .NET Framework 3.5 (includes .NET 2.0 and 3.0) option. For AGRIS, you do not need to checkmark the options for HTTP Activation. Click Next until you are on the Confirmation step.
On the Confirmation step, click Install
Once the installation is complete, click Close to close the Add Roles and Features Wizard.
Close the Server Manager.
Proceed with the next step in the AGRIS installation
For all other supported Server operating systems, there are no extra steps for the .NET Framework.
- Open the Agrisdist network share created in section 2.10
- Open the Setup.exe:
- Right-click the Setup.exe and choose Run as Administrator. If there is a User Account Control message, click Allow.
- If the computer does not have version 4.7.2 of the .NET Framework installed, the installation process will prompt to install it. Click Install to start the installation. This process can take several minutes to complete. You will be prompted to reboot after this. You can choose to reboot now or later, however rebooting after the .NET Framework installation is mandatory before proceeding with the remainder of the AGRIS installation. Reboot and then log back in as the same user, and the AGRIS installation will automatically continue.
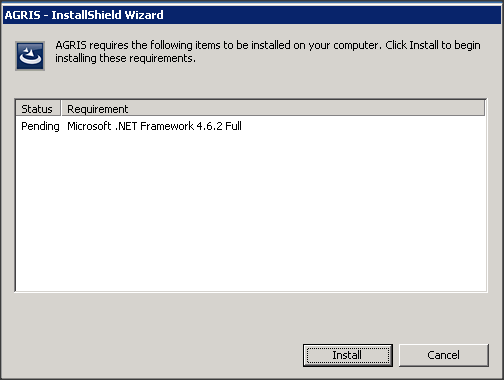
The .NET Framework Installation Window
- The Installation Wizard will appear.
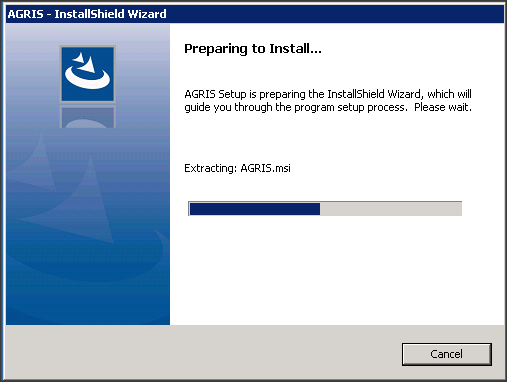
The Installation Wizard
- The AGRIS Setup window will appear.
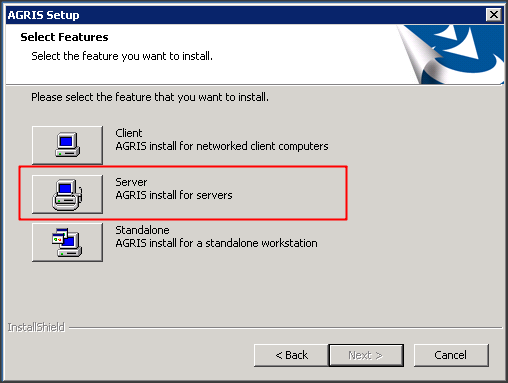
The AGRIS Setup Window
- Click Server to display the Choose Distribution Folder window.
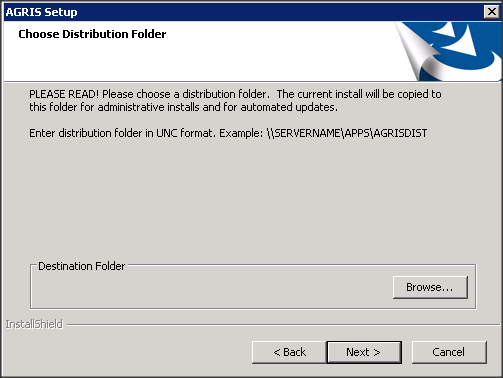
The Choose Distribution Folder Window
- Click Browse to display the Choose Folder window.
- Navigate to the UNC path of the Agrisdist folder defined previously in Section 2.11 (i.e. \\servername\Apps\Agrisdist).
- Click OK to close the Choose Folder window and return to the Choose Distribution Folder window.
- Click Next to display the Welcome window.
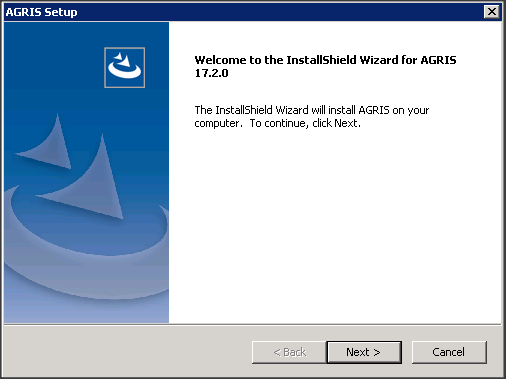
The Welcome Window
- Click Next to display the Choose Destination Location window.
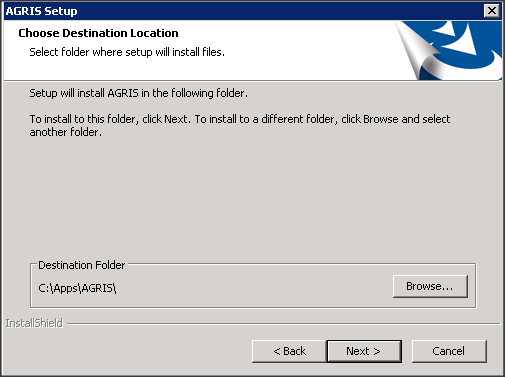
The Choose Destination Location Window
- Click Browse to re-display the Choose Folder window.
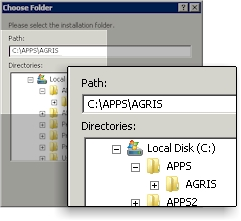
The Choose Folder Window
- Navigate to the AGRIS folder defined previously in Section 2.11 (i.e. C:\Apps\AGRIS). This path must be a path that begins with a local drive letter; a UNC path is not allowed.
- Click OK to accept your changes.
- Click Next to display the COM+ User Identity window.
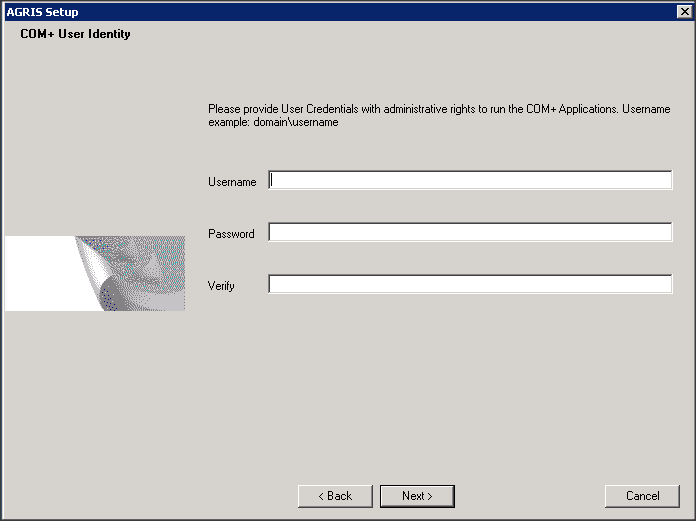
The COM+ User Identity Window
- Type your user name in the Username field. Ensure you prefix your domain to the username, as in DOMAIN\USERNAME
- Type your password in the Password field.
- Retype your password in the Verify field to verify it is correct.
- Click Next to continue. If the two password entries do not match, a message appears:
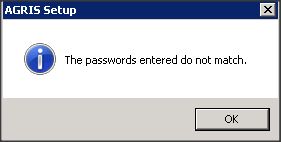
The Password Mismatch Message
- Click OK to return to the password fields and correct the mismatch.
- Click Next to continue.
- The AGRIS Setup process will proceed.
- The installation proceeds automatically until the Installation Complete window appears. This process may take several minutes to complete.
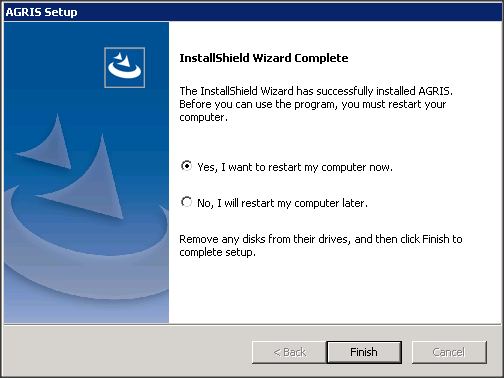
The Installation Complete Window
- AGRIS requires that you restart your computer following installation to allow the installed components to run properly.
- Select the Yes, I want to restart my computer now option.
- Click Finish.
- The Optimization Settings window will appear. See Section 14.9 for more information about the Optimization Settings. Click Yes to apply the recommended settings, otherwise click No to proceed.
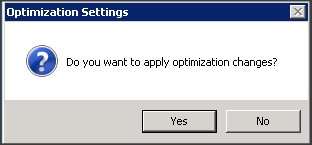
The Optimization Settings Window
- The final step in the installation process takes place in a command window. Do not manually close this window. When complete, this command window will automatically close and the computer will restart.
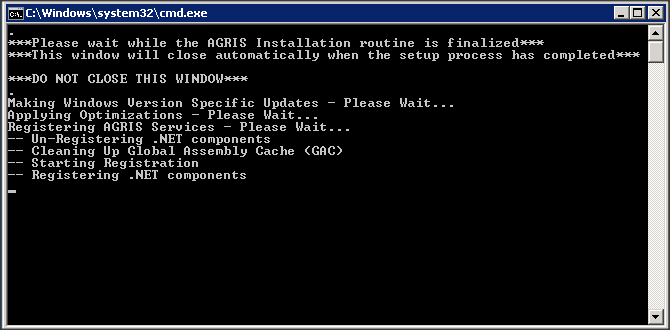
The Command Window
Citrix Server/Terminal Server Installation
AGRIS 20.2.0 Citrix Server/Terminal Server Installation checklist
Install components in the following order based on the application server software being used:
Citrix Server | Windows Server 2012 R2 Terminal Services |
|---|---|
Latest Windows Service Pack | No Service Pack |
Install Terminal Services | Install Terminal Services |
Install MetaFrame XP/Presentation Server or Citrix XenApp 6.5.0 | |
Pervasive® PSQL™ 32-bit Client | Pervasive® PSQL™ 32-bit Client |
AGRIS Server | AGRIS Server |
Installing AGRIS 20.2.0 Server on Citrix Server/Terminal Server
- Log all users out of the Citrix/Terminal Server(s) and prevent additional users from logging on while installing AGRIS.
- Close all other applications and restart the server.
- Install a supported version of Pervasive® PSQL™ using the instructions available on the AGRIS Customer Portal site:
https://culturana.force.com/s/article/ka036000000oLocAAE/AGRIS-Installing-Actian-PSQL-v12-SP1-and-Update-3?r=1 - Complete section 3.2 to install AGRIS.
- Manually set the AGRIS data path - see Section 13.1 for additional information.
- Save the AGRIS data path and restart the server.
Note: Ensure all AgroGuide users connecting via a Citrix Server/Terminal Server have full control of the Program Files\Common Files directory on that server.
Environment variable required on a Citrix Server/Terminal Server for AGRIS
A Citrix Server/Terminal Server running AGRIS needs to have an AgrisTS=1 System Environment Variable on it in order for AGRIS to function correctly (for correctly mapping printers to the correct station for example). To add/check this:
- Open Control Panel -> System and Security -> System
- Click the Advanced System Settings link
- Click the Environment Variables… button
- In the System Variables, see if there is a variable called AgrisTS. If there is not, add one by clicking New in that section.
- The variable name will be AgrisTS with a value of 1 (number one)
- Click OK and OK again to save the changes
AGRIS as a default will assign your PSN (workstation number) by your NIC (network card number), not by your login. Users logging in to AGRIS through Citrix Server/Terminal Server will all have the same NIC address, creating conflicts. The AgrisTS will change AGRIS so that it assigns your PSN by your network Log-in ID instead. This ensures that everyone not only has unique station numbers but they will also have the same station number at each login. Each workstation logging in thru a Citrix Server/Terminal Server should have its own unique user id.
Client Installation
AGRIS Client Workstation Installation Checklist
Install components in the following order based on the workstation operating system:
Windows 8.1 | Windows 10 |
|---|---|
No Service Pack | No Service Pack |
Pervasive® PSQL™ 32-bit Client | Pervasive® PSQL™ 32-bit Client |
AGRIS Client | AGRIS Client |
AGRIS 20.2.0 Client Installation Procedure
IMPORTANT:Before installing the AGRIS Client, install a supported version of Pervasive® PSQL™ on the client workstation using the instructions available at; at
https://culturana.force.com/s/article/ka036000000oLocAAE/AGRIS-Installing-Actian-PSQL-v12-SP1-and-Update-3?r=1
- Installing the .NET Framework:
- For Windows 8.1 and Windows 10, part of the.NET Framework must be installed through the Programs and Features:
- Click Start and type "Programs and Features", then click on the Programs and Features.
- Click on the Turn Windows Features on or off link.
- Checkmark the .NET Framework 3.5 (includes .NET 2.0 and 3.0) checkbox
- Click OK to start the installation
- Once the installation is complete, click Close
- Close the Programs and Features
- Proceed with the next step in the AGRIS installation.
- For all other supported client operating systems, there are no extra steps for the .NET Framework.
- For Windows 8.1 and Windows 10, part of the.NET Framework must be installed through the Programs and Features:
- Open the Agrisdist network share created in section 2.10,
- Open the Setup.exe:
- Right-click the Setup.exe and choose Run as Administrator. If there is a User Account Control message, click Allow.
- If the computer does not have version 4.7.2 of the .NET Framework installed, the installation process will prompt to install it. Click Install to start the installation. This process can take several minutes to complete. You will be prompted to reboot after this. You can choose to reboot now or later, however rebooting after the .NET Framework installation is mandatory before proceeding with the remainder of the AGRIS installation. Reboot and then log back in as the same user, and the AGRIS installation will automatically continue.
The .NET Framework Installation Window
- The Installation Wizard will appear
The Installation Wizard
- The installation proceeds automatically until the AGRIS Setup window appears.
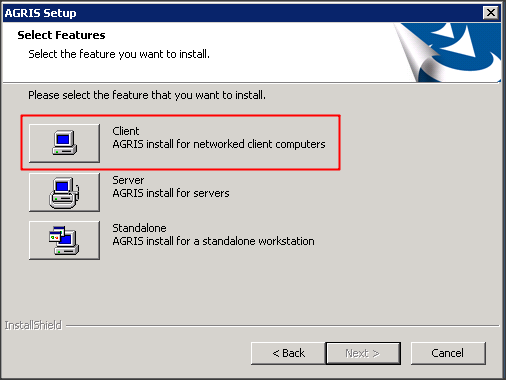
The AGRIS Setup Window
- Click Client to load the AGRIS client installer and display the Welcome window.
The Welcome Window
- Click Next to display the Choose Destination Location window
The Choose Destination Location Window
- The Destination Folder defaults to C:\apps\AGRIS. To specify a different folder, click Browse to display the Choose Folder window. This path must begin with a local drive letter (i.e. C:\APPS\AGRIS); do not use a UNC path for this folder.
The Choose Folder Window
- After determining the Destination Folder, Click Next to display the Select AGRIS Data Path window.
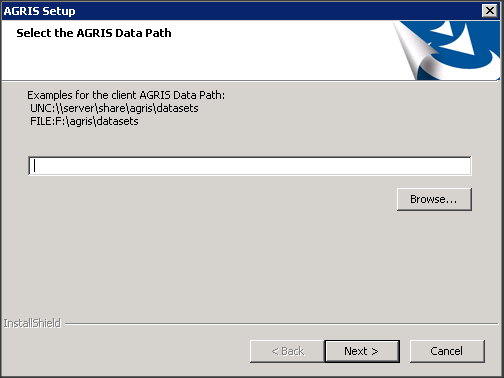
The Select AGRIS Data PathWindow
- Type the path to the AGRIS server datasets in this field. For example: \\server\folder\subfolder\datasets
- You can also search for the datasets folder by clicking Browse....
- Click Next to continue. The installation proceeds automatically until the Installation Complete window appears.
The Installation Complete Window
- AGRIS requires that you restart your computer following installation to allow the installed components to run properly.
- Select the Yes, I want to restart my computer now option.
- Click Finish.
- The Optimization Settings window will appear. See Section 14.9 for more information about the Optimization Settings. Click Yes to apply the recommended settings, otherwise click No to proceed.
The Optimization Settings Window
- The final step in the installation process takes place in a command window. Do not manually close this window. When complete, this command window will automatically close and the computer will restart.
The Command Window
Optional Separate Component Server Installation
The majority of users designate a single server to act as the Component Server and to store the database files. Customers that extensively use the reporting features of AGRIS may require a separate server to act as the Component Server. Please call the Technical Assistance Center (800-366-2474) to determine if a separate Component Server is necessary, or advisable.
AGRIS Component Server Installation Checklist
Install components in the following order:
Pervasive® PSQL™ 32-bit Client |
Create a COM+ Services User Account |
AGRIS Server |
Installing A Separate Component Server
Install the Pervasive Client Engine in accordance with the instructions available at
https://culturana.force.com/s/article/ka036000000oLocAAE/AGRIS-Installing-Actian-PSQL-v12-SP1-and-Update-3?r=1
Install the AGRIS Server in accordance with the instructions contained in section Server Installation.
Install the AGRIS Client in accordance with the instructions contained in section Client Installation.
Standalone Installation
AGRIS Standalone Workstation Installation Checklist
Install components in the following order based on the workstation operating system:
Windows 8.1 | Windows 10 |
|---|---|
No Service Pack | No Service Pack |
Pervasive® PSQL™ Workgroup | Pervasive® PSQL™ Workgroup |
AGRIS Standalone | AGRIS Standalone |
AGRIS 20.2.0 Standalone Installation
- Installing the .NET Framework:
- For Windows 8.1 and Windows 10, part of the.NET Framework must be installed through the Programs and Features:
- Click Start and type "Programs and Features", then click on the Programs and Features.
- Click on the Turn Windows Features on or off link.
- Checkmark the .NET Framework 3.5 (includes .NET 2.0 and 3.0) checkbox
- Click OK to start the installation
- Once the installation is complete, click Close
- Close the Programs and Features
- Proceed with the next step in the AGRIS installation.
- For all other supported standalone operating systems, there are no extra steps for the .NET Framework.
- For Windows 8.1 and Windows 10, part of the.NET Framework must be installed through the Programs and Features:
- If you did not create a network share in section 2.10:
- Insert the AGRIS 20.2.0 CD into the CD ROM. Use the Windows Start\Run utility to browse to setup.exe on the CD.
- Open the Setup.exe:
- Right-click the Setup.exe and choose Run as Administrator. If there is a User Account Control message, click Allow.
- If the computer does not have version 4.7.2 of the .NET Framework installed, the installation process will prompt to install it. Click Install to start the installation. This process can take several minutes to complete. You will be prompted to reboot after this. You can choose to reboot now or later, however rebooting after the .NET Framework installation is mandatory before proceeding with the remainder of the AGRIS installation. Reboot and then log back in as the same user, and the AGRIS installation will automatically continue.
The .NET Framework Installation Window
- The Installation Wizard will appear
The Installation Wizard
- The installation proceeds automatically until the AGRIS Setup window appears.
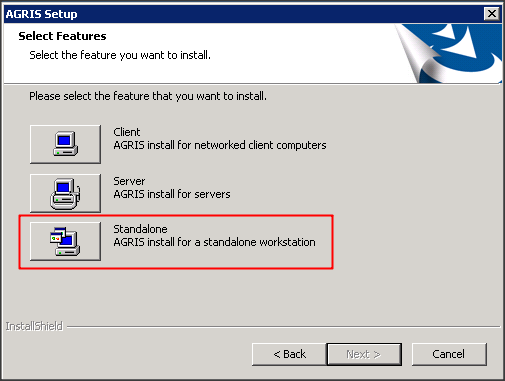
The AGRIS Setup Window
- Click Standalone to load the AGRIS Standalone application installer and display the Welcome window.
The Welcome Window
- Click Next to display the Choose Destination Location window
The Choose Destination Location Window
- The Destination Folder defaults to C:\apps\AGRIS. To specify a different folder, click Browse to display the Choose Folder window. This path must begin with a local drive letter (i.e. C:\APPS\AGRIS); a UNC path is not allowed.
The Choose Folder Window
- After determining the Destination Folder, Click Next to continue the installation.
- The installation proceeds automatically until the Installation Complete window appears.
The Installation Complete Window
- AGRIS requires that you restart your computer following installation to allow the installed components to run properly.
- Select the Yes, I want to restart my computer now option.
- Click Finish.
- The Optimization Settings window will appear. See Section 14.9 for more information about the Optimization Settings. Click Yes to apply the recommended settings, otherwise click No to proceed
The Optimization Settings Window
- The final step in the installation process takes place in a command window. Do not manually close this window. When complete, this command window will automatically close and the computer will restart.
The Command Window
Starting AGRIS
To start AGRIS, select it from the Start/Programs/AGRIS, or double-click the AGRIS icon on the desktop.
- The initial launch of AGRIS creates an empty database, if one is not present in the data path.
- Three messages appear when a database is created.
- The name message indicates how the database is stored internally.
- Naming convention: A[dataset number] + [date stamp] + [time stamp]
- The second message verifies that the database is created.
- The third message verifies the database connection.
- The name message indicates how the database is stored internally.
- The new dataset appears in the Available Datasets menu. Select the dataset and the AGRIS System menu appears.
- Proceed to the Licensing Setup section.
Converting Datasets
If you are converting from earlier versions of the AGRIS Business System to Version 20.2.0, this is a simple process.
Note:If you are upgrading from AGRIS Version 9.4.6.x or earlier, please contact Greenstone Technical Support (800-366-2474). Conversions from V9.4.6.x or earlier are not supported in this upgrade.
Converting to AGRIS 20.2.0
- Launch AGRIS 20.2.0 and the Select Dataset screen will appear.
- Choose the desired dataset and click Select.
- A window appears describing that a dataset conversion is required.
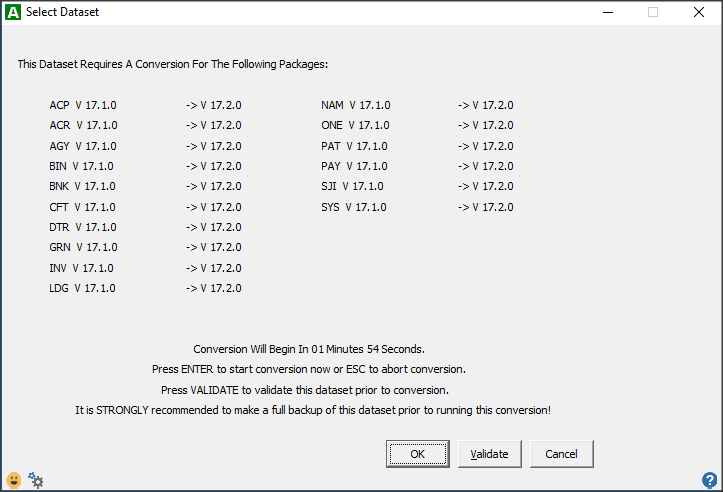
Example of the Dataset Conversion Window
- When the Dataset Conversion window appears:
- Click Validateprior to starting the conversion process to scan the original datasets for any potential problem areas that need to be addressed prior to the conversion.
- Click OK to start the conversion process.
- When the conversion is complete,
- The system displays the main menu if system security is turned off.
- The Login screen appears is system security is enabled for the dataset. Be sure to login to the dataset to finalize the conversion routine.
- If there are any errors during the conversion phase, from the Utilities menu, select Error Log to print an error report.
- Select any user-defined report from any package to convert all user-defined reports.
- If any files do not convert, you should call Technical Assistance Center (800-366-2474) for assistance.
Note:The conversion process takes longer on a workstation with a slower processor. Even on a faster workstation the conversion may take quite a while.
Note: Please be aware of the following considerations when converting datasets:
- A dataset must be converted before users (and other services) can access it.
- Each dataset requires its own conversion.
- Once the dataset conversion process is complete, it is complete for all users.
- Complete the first dataset conversion from start to finish (including logging into the dataset) before starting other conversions. This ensures that the Datasets*.AGR files, which are shared between all datasets, convert successfully.
- Converting a dataset on the database server typically takes less time than on a client machine.
- Simultaneously converting multiple datasets may significantly degrade performance if large file sizes are present. If you still wish to convert multiple datasets simultaneously, please contact the Technical Assistance Center for more details.
- Consider prioritizing the conversion of datasets to minimize the impact to end users.
Licensing Setup
Use the licensing setup to set the number of user licenses for each purchased package. The licensing setup for the AGRIS Business System is located in the main system menu under Help. Use this process along with the licensing diskette that accompanies the AGRIS 20.2.0 installation CD. Load the licensing diskette during installation or if any package licenses are upgraded.
Note:Program module icons are not present until the package is licensed for use. An access code is required during this procedure, so perform this procedure during hours when the Technical Assistance Center (800-366-2474) is available. Tell them that you are performing the license update procedure and need an access code.
Setting up AGRIS Licenses
- From the AGRIS System Manager Menu, select Help, and then Update Licenses.
- When prompted to Update Allocated Package Licenses, click Yes.
- Contact our Technical Assistance Center (800-366-2474) for an access code to enter in the Database Security Configuration window.
- Read the Access Number to the Support Representative, who then provides an Access Code for you to enter.
- In the Source field, provide the path to where the AGRIS.LIC file resides (if the AGRIS.LIC file exists in C:\Apps then C:\Apps is your source, not C:\Apps\AGRIS.LIC). Please note that AGRIS license files are generally sent via email and must be saved to a directory in order to apply it. Be sure to save the file with the name AGRIS.LIC as any other name will cause the license update process to fail.
- In the Destination field, type the drive letter and folder location of your AGRIS dataset.
- Click OK. The Update Licenses window appears and displays the following information:
- Licenses Column shows your License count before the update.
- Update To indicates what your new changes will be.
- View Only is the View count before any changes.
- Upgrade To is your new View License count.
- Click Apply to initialize your changes.
- If you want to view license changes, from the AGRIS System Manager Menu, select Help, and then About AGRIS.
- Click File, and then Print.
- The last section of the printout shows your licensing information.
- If anyone is using any of the packages, the Licenses In Use column is updated.
- If anyone is in the view function, the View Only In Use column is updated.
Note:
You must set up system security in AGRIS for Licensing to function properly. If system security is not set up, the Licenses in Use is updated, but the View Only In Use is not updated.
The oneWeigh package has total access, meaning that the Licenses in Use is updated, but the View Only In Use is not, regardless of security.
Setting up the Extended Options License
Note: Extended options control access to selected package menu options. Upgrading to AGRIS 20.2.0 requires application of initial extended option settings from the license file. All extended options are considered "off" until this process is complete. Skipping this process will block access to package menu options controlled by extended options.
- From the AGRIS System Manager Menu, select Help, and then Update Extended Options.
- When prompted to Update Allocated Extended Options, click Yes.
- Contact our Technical Assistance Center (800-366-2474) for an access code to enter in the Database Security Configuration window.
- Read the Access Number to the Support Representative, who then provides an Access Code for you to enter.
- In the Source field, provide the path to where the AGRIS.LIC file resides (if the AGRIS.LIC file exists in C:\Apps then C:\Apps is your source, not C:\Apps\AGRIS.LIC). Please note that AGRIS license files are generally sent via email and must be saved to a directory in order to apply it. Be sure to save the file with the name AGRIS.LIC as any other name will cause the license update process to fail.
- In the Destination field, type the drive letter and folder location of your AGRIS dataset.
- Click OK. The Update Extended Options window appears and displays the following information:
- Extended Option number
- Description
- Current Setting
- Change To
- Click Apply to initialize your changes.
- Click Yes to update the current dataset with the default system settings and exit the extended options.
Note:
If the current dataset has already been converted to AGRIS 20.2.0 and this is the first time Extended Option System Default Settings have been updated, then elect to update the current dataset with the System Default Settings. Once Extended Option System Default Settings are set, they will be automatically applied to a dataset during conversion to AGRIS 20.2.0, or when a package is initialized in a dataset.
If an extended option is enabled in the System Default file, then that option can be enabled\disabled per dataset.
Installing Additional AGRIS Components
Point of Sale (POS)
As of Version 9.5.0.0, Point of Sale (POS) is no longer part of the AGRIS system.
Blender Control Setup
The following Automated Blender Controls are available for AGRIS.
- Junge® Interface – Data Manager
- Kahler® Interface – Data Manager
- Murray® Interface – Data Manager
- Automated Controls Manager
Please contact the Technical Assistance Center (800-366-2474) for detailed setup instructions.
Note:
Starting with AGRIS V9.5.0.0, the Automated Blender Setup procedure now requires the assignment of an AGRIS dataset user, which allows the Auto Blender service to login to the dataset and load session information relative to the dataset.
Please refer to section 2.16 for instructions on updating the Auto Blender configuration information.
The AGRIS Initialization File
The AGRIS Initialization file (agris.ini) is located in the root of the AGRIS installation folder and contains eight lines at the end that may need to be set depending on your configuration of AGRIS.
Path Settings
The agris.ini file is primarily used to instruct clients as to where datasets and user defined reports are located. It is located in the root of the AGRIS installation folder and contains 6 lines at the end that may need to be set depending on your configuration of AGRIS.
Essentially, the Data Path and Work Path should be filled in. The remaining paths will default to the correct locations based on how the Data Path is set.
Note:Path setting information is also provided in the agris.ini file.
Data Path | This is the path to the location of the agris\datasets folder where all of your data is kept. If running standalone this value does not need to be set since it defaults to the local machine. If running in a client server environment this value needs to point to the database server. |
Support Path | This is the path to the location of the support folder. By default this is set relative to the path set for the Data path. |
Userprog Path | This is the path to the location of the userprog folder. By default this is set relative to the path set for the Data Path. |
Work Path | This is the path to the location of where AGRIS creates temporary files. By default this is set to the Data path. (For best performance, set this to a local drive. Example: c:\apps\agris\temp) |
Component Server | This is the name of the server that runs the AGRIS COM+ applications. If left blank, this setting is derived from the Data path. Otherwise, this can be set to the name of a separate Component Server on the network. |
Locking Server | This is the name of the server that runs the AGRIS COM+ ServerLock application. If left blank, this setting is derived from the Data path. Otherwise, this can be set to the name of a separate Locking Server on the network. When this field is used all clients need to use the same Locking Server or data corruption could occur due to multiple locking servers. |
GEOData Path | This parameter provides the ability to reference your Georeference data such as TIGER data from various locations on your network. This path can contain drive letters or UNC but it must be a valid location, otherwise you will get an error. If the GEOData Path is empty then the default is Agrisroot\support\agy. If the GEOData Path is set then this value will override the default. |
Notification URL | Using Notification URL01 - 99 you can point to different Web Services that may be needed. They must be sequentially set with no gaps, starting with Notification URL01. |
Original File Source Code
;Agris Setup Information
;---------------------------------------------------------------------
;The following explain how the paths will default if not set here or
;if the folder the setting points to does not exist at startup.
;Assuming Agris was installed in C:\AGRIS, Data Path will be set to
;C:\AGRIS\DATASETS.
;Support Path will be set relative to the Data Path if Support exists
;there else the Support Path is set relative to the application/program
;path. This folder is required for the application to run and the
;installation program installs Support under the application folder
;i.e. C:\AGRIS. Agris will not create the support folder. It assumes
;it already exists.
;Userprog Path will be set relative to the parent
;folder of the Data Path setting, if USERPROG folder
;exists there. If not, the UserProg path will be created.
;Work Path will be set to Data Path if Work Path is left blank.
;Work Path will be set relative to drive specification of the Data Path
;setting if Work Path does not contain a drive specification. Assuming
;Data Path is set to C:\AGRIS\DATASETS and Work Path is TEMP, then
;Work Path would be reset to C:\TEMP. Work Path will not be reset if
;Work Path is set to an absolute path such as C:\TEMP. Agris startup
;verifies the Work Path. If work path doesn't exist Agris will attempt
;to create it but parent folders cannot be created. If the parent folder
;does not exist the create work path will fail which will cause Agris to
;terminate.
;Component Server will be set to the name of the database server if
;Component Server is left blank. Otherwise, specify the name of the
;server which you intend to utilize as your component server. You can
;also specify the ip address of the component server but it is not
;recommended.
;Locking Server will be set to the name of the database server if
;the Locking Server is left blank. This has been the default behavior
;for prior AGRIS releases. In most cases, this field will be blank.
;However, if this field is set, it is recommended that it be set to
;one (and only one) of the component servers.
;GEOData Path provides the ability to reference your GEOReference
;data such as TigerData from various locations on your network.
;This path can contain drive letters or UNC but it must be a valid
;location, otherwise you will get an error. If the GEOData Path is
;empty then the default is Agrisroot\support\agy. If the GEOData
;Path is set then this value will override the default.
;Notification URL01 through Notification URL99 can be set to
;point to different Web Services that may be needed. They must
;be sequentially set with no gaps starting with Notification URL01.
;For example, Notification URL03 can not be set unless
;Notification URL01 and Notification URL02 have been set. If
;Notification URL02 needs to be removed, then Notification URL03
;should be changed to Notification URL02 or Notification URL02
;must be set to something like "Available" or "Unused".
;Sample settings
;
;Scenario 1
;
;Data Path=g:\agris\datasets
;Support Path=
;Userprog Path=
;Work Path=
;Component Server=
;Locking Server=
;
;Scenario 2
;
;Data Path=\\servername\apps\agris\datasets
;Support Path=
;Userprog Path=
;Work Path=
;Component Server=CUSTSVR01
;Locking Server=
;GEOData Path=\\apps\georeference\Tiger
;Notification URL01=http://servername1:23350/agrisgateway/service
;Notification URL02=available
;Notification URL03=http://servername2:23350/agrisgateway/service
;
;Scenario 3
;
;Data Path=\\servername\apps\agris\datasets
;Support Path=
;Userprog Path=\\servername\apps\agris\userprog
;Work Path=\\servername\apps\agris\workpath
;Component Server=CUSTSVR01
;Locking Server=CUSTSVR01
;
;Scenario 4
;
;Data Path=\\servername\apps\agris\datasets
;Support Path=
;Userprog Path=\\servername\apps\agris\userprog
;Work Path=\\servername\apps\agris\workpath
;Component Server=CUSTSVR01
;Locking Server=LOCKINGSVR
;
;Scenario 5
;
;Data Path=
;Support Path=
;Userprog Path=
;Work Path=
;Component Server=
;Locking Server=
;
;---------------------------------------------------------------------
[Paths]
Data Path=
Support Path=
Userprog Path=
Work Path=
Component Server=
Locking Server=
GEOData Path=
Notification URL01=
Utility Information
The Alternate AGRIS INI File
AGRIS includes an option that allows you to use an alternate initialization file. This feature allows you to set up multiple INI files, pointing to various locations, based on the options set in those INI files. This feature also allows you to access reports from another USERPROG directory.
To use this feature, you must edit the AGRIS shortcut:
- Add this command line switch to the target location in the shortcut to set the INI file location: /I[path]
/I is the command switch to turn on the feature.
path is the valid operating system path to the INI file. May contain the INI file name or just a path. If no file name supplied then the AGRIS.INI is assumed. If the INI file cannot be found using this path, then the AGRIS.INI file from the currently installed location is used.
Example: C:\APPS\AGRIS\BIN\SysMenu.exe /In:\companya\agris.ini
- The following screen shows the INI file location on a drive mapped to Drive N:
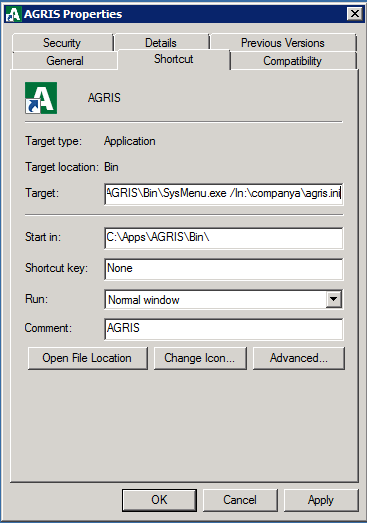
The AGRIS Properties Window
- The Target command, above, shows an example of allowing the shortcut to point to an alternate agris.ini file. This is accomplished by including the "/I" parameter, followed by the drive letter and full directory path, then the name of the agris.ini file. You can also use this new parameter within a .BAT file from DOS when launching the main AGRIS menu (SysMenu.exe). You can set up multiple desktop shortcuts or batch files and use the command line parameter to access the alternate agris.ini files. The contents of the alternate agris.ini file allow access to multiple sets of "dataset" directory and "userprog" directories with one installation of the Version 20.2.0 system.
- Add the current .ini file location and current SUPPORT and USERPROG path settings. Since you can access multiple INI files, the System Information Report was enhanced to show the currently active Userprog, Support and Data paths, and the currently active agris.ini file.
Diagnostics Utilities
The Utilities >> Diagnostics menu option allows network connectivity and performance testing.
Testing Remote Components
Use this feature to test remote connectivity for COM+ applications.
- From AGRIS click Utilities >> Diagnostics to display the Diagnostics window.
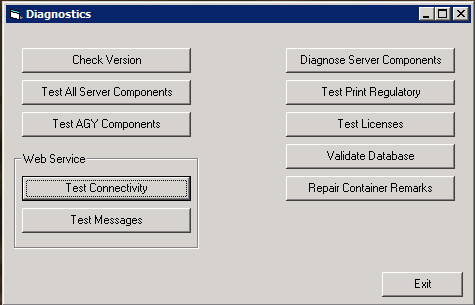
The Diagnostics Window
- You can perform the following tests:
Check Version
This test shows the version of AGRIS installed on the Client and the Server.
Test All Remote Components
This test shows the results of testing all of the COM+ components. The following information is displayed in the results:
PKG | Category the component belongs to. |
Component | Name of the component (Program ID). |
Status | Status of testing ("Ok" or "Error"). |
Starttime | Time the component instantiation command was issued. |
Endtime | Time of the completion of the component destruction command. |
Error | Description of the error if Status is not "Ok", otherwise it is an empty string. |
Note:It may take longer for the test to finish if there are errors in the creation of some components.
Test AGY Components
This tests only the AgroGuide (AGY) COM+ components. Results are provided in the same format as the full test.
Test Only API XML Components
This tests only the API XML COM+ components. Results are provided in the same format as the full test.
Diagnose Server Components
This tests for connectivity between the client workstation and the COM+ server. The Sys_Svr_TestRemote.cls TestRemote tests basic connectivity between the workstation and the server to be able to create objects. The ShrDataServProxy.DTransMGR tests that connectivity is in place for the FMB and CPR applications.
You must specify the "Remote Server Name or IP address" to test remote application connectivity. Use this test to determine if components are responding to program calls. If the test fails, then specify the IP address of the server to bypass/confirm name resolution problems. The Remote Server Name defaults to the AGRIS Component Server specified in the agris.ini file. If the component server is not specified in the agris.ini then the default is the database server. If the test passes with the Server IP address but not with the Server Name then there is probably a problem with name resolution on the network. Name resolution must be functioning correctly for some AGRIS modules to work.
Test the components by clicking either "Test Sys_Svr_TestRemote.cls TestRemote" or "Test ShrDataServProxy.DTransMGR" to test the remote server components. These buttons instantiate an object on the specified COM+ server, then call that object. A box containing the following message appears:
server name:component name.objectname is responding.
There is also an option to manually enter any COM+ component and click Create Object on any dll class to test that individual component.
Test Print Regulatory
This test provides the performance information of the print regulatory routine through an indefinite loop. The performance of the routine is shown on the form and any anomaly is recorded to the specified file for later analysis.
- From the System Manager, click Utilities >> Diagnostics >> Print Regulatory.
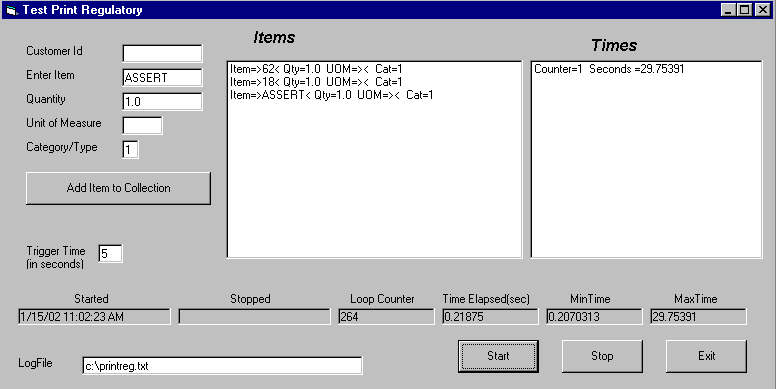
The Test Print Regulatory Window
- Enter the item to test.
- Enter the trigger time.
- Enter log file.
- Click Start.
- Click Stop to terminate the test. To include multiple items in the test follow these steps for each item and then use Start and Stop:
- Enter customer ID: not required.
- Enter item code: the inventory item number to be included.
- Enter Quantity.
- Enter UOM: (not required) if entered, it converts the quantity between the stock UOM and the entered business UOM.
- Enter category: only 1 and 2 cause extra database access. The value doesn't have to be the actual category type of the item.
- Click Add Item to Collection.
- Click Start.
- Click Stop to terminate the test.
Note: The trigger time determines whether an iteration incurs a performance anomaly. If an iteration exceeds the trigger time, the log file records and shows it on the Times list box.
During the execution, after you click Start, the performance appears on the screen:
Started | The time the start button is clicked – the execution starts. |
Stopped | The time the Stop button is clicked – the execution stops. |
Loop Counter | The current loop/iteration number. |
Time Elapsed | The elapsed time since the start of the execution. |
Min Time | The minimum execution time for any loop/iteration during the execution. |
Max Time | The maximum execution time for any loop/iteration during the execution. |
Test Licenses
Use this feature to test license performance. If noticeable delays are occurring while navigating the AGRIS System, this utility helps diagnose the problem. Typically, it should take less than a second for the system to access a license, but there are instances where it could take longer. If times are consistently longer than a second, then the network configuration may need to be investigated. Typically, when these delays occur, they are caused by improper network configurations.
The licensing component is called after selecting most System Manager Menu options. It accesses a license and then compares the current count to the licenses purchased.
To access this utility from AGRIS:
- Click Utilities >> Diagnostics >> Test Licenses.
- Click Start Test to access a license
- Count the total in use
- Release the license each second. Once started, the button changes to Stop Test.
- Click Stop Test to stop the test.
Validate Database
A new validation utility now allows you to scan datasets for errors before converting them.
To access this utility from AGRIS:
- Click Utilities >> Diagnostics >> Validate Database to display the Validate Database window.
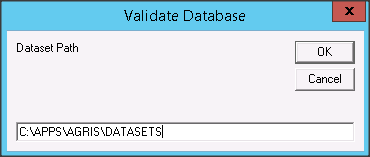
The Validate Database Window
- Either accept the default path and filename to validate the current dataset, or type in the location of another dataset you want to validate.
- Click OK to run the validation utility.
- When the validation process is complete, any errors are displayed in an error log.
Database Conversion Validation
If your datasets require reformatting as part of the upgrade to AGRIS 20.2.0, a new validation utility now allows you to scan these datasets for errors before converting them.
When starting a Dataset Conversion during the upgrade to Version 20.2.0, the Select Dataset window will appear.
A Typical Select Dataset Window
- Click the new Validate button prior to starting the conversion process to scan the original datasets for any potential problems areas that need to be addressed prior to the conversion.
Click OK to start the conversion process. When the conversion is complete, the system displays the main menu.

The Database Conversion utility creates a log entry for the conversion of each package in the dataset.
When reviewing the conversion log (convert.log) following a dataset conversion, you may see old dates in the log entries. This occurs when you have converted a dataset before. The log appends any new log entries to the bottom of the existing log, which can result in the same file appearing in the file multiple times, with different conversion dates.
Printer Associations
A new feature introduced in AGRIS V9.4.1 allows for text drivers to be associated with more than three printers. Text drivers are helpful for making forms and checks format correctly when printed and also makes printing more efficient.
To utilize this new feature, please follow the steps below.
- Launch AGRIS.
- Click Customize >> Printer Drivers to display the Printer Driver Maintenance window.
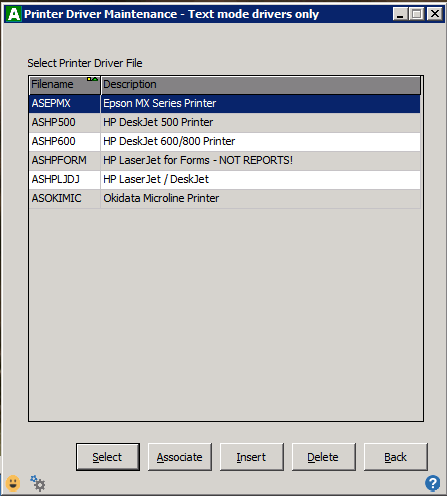
The Printer Driver Maintenance Window
- Select the print driver you wish to associate and click Associate to display the Define Associations window displaying a list of printers available on the workstation.
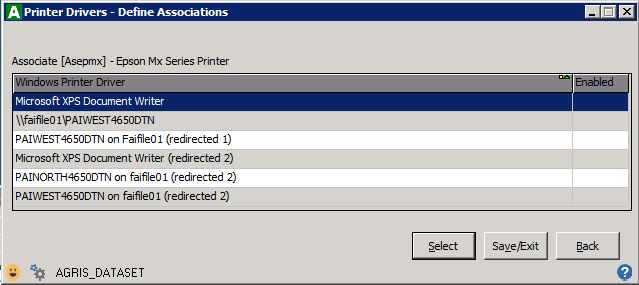
The Define Associations Window
- Select the desired printer and click Select. An X appears in the Enabled column indicating that a printer has been selected for association.
- To deselect a printer that is currently enabled, just select the printer again and click Select.
- Repeat Step 4 for as many printers as necessary.
- Click Save/Exit to save your changes and return to the Printer Driver Maintenance window.
- To associate other print drivers, repeat Steps 3-6, as needed.
Appendices
Appendix A – Install Mode on Citrix Servers/Terminal Servers
Install mode is used to install applications in such a way that all profiles that reside on a Citrix Server/Terminal Server are updated by the installation. Therefore, before installing any applications on a Citrix Server/Terminal Server, it is important to enter install mode.
Entering Install Mode
- Click Start >> Run.
- Type in CMD and press [Enter].
- At the command prompt, type change user/install and press [Enter]. A line appears, indicating that the user session is ready to install applications.
Exiting Install Mode
- Click Start >> Run.
- Type in CMD and press [Enter].
- At the command prompt, type change user/execute and press [Enter]. A line appears, indicating that the user session is ready to execute applications.
- Close the command prompt. Alternately, restarting the server also returns it to Execute mode.
Appendix B – Common Applications that may Prevent Installation
- ICA Administrator Toolbar
This is typically a grey bar with icons that runs vertically along the right hand side of the screen on a Citrix Server:
- Right-click this bar.
- Click Exit to close the toolbar.
- Double-click Retry to continue the installation.
- Aecomm.exe
This program typically runs on a oneWeigh workstation. To close it:
- Press [Ctrl][Alt][Delete].
- Click Task Manager.
- Click Processes tab.
- Locate and click Aecomm.exe.
- Click End Process.
- Click Yes on the Task Manager Warning message.
- Close Task Manager.
- Double-click Retry to continue the installation.
Appendix C – Setting the Screen Resolution to 1024x768 or higher
- Click on Start >> (Settings) >> Control Panel.
- Double-click the Display icon.
- Click Settings tab.
- Adjust the Screen resolution slider so that it is set to at least 1024x768.
- Click OK.
Note: If you want to review your new screen resolution setting before accepting it, click Apply first, review the new screen, then click OK.
- Close the Control Panel.
Appendix D – Finding your Domain or Server Name
- Go to the AGRIS server
- Right-click My Computer >> Properties.
- Click the Computer Name or Network Identification tab.
- Find the Full computer name section. Both the server name and the domain name are both referenced in this section.
Example: ServerDC is the server name and AGRIS is the domain name.The full computer name is ServerDC.AGRIS.local.
Appendix E – oneWeigh Security Changes:
oneWeigh security is integrated into the AGRIS System Security utility. If you are currently using security in AGRIS or oneWeigh on a version prior to V9.4.x, refer to the following scenarios to determine which change you need to make:
Scenario 1: AGRIS Security OFF - oneWeigh security ON
All existing oneWeigh security is disabled and users can access all oneWeigh dialogs without passwords until AGRIS Security is enabled for the dataset and the oneWeigh users' security accounts are configured.
Scenario 2: AGRIS Security ON - oneWeigh Security OFF
Until their oneWeigh security account is configured, users can access to AGRIS but not oneWeigh.
Scenario 3: AGRIS Security ON - oneWeigh Security ON
Until their oneWeigh security account is configured, users can access to AGRIS, but all existing oneWeigh security is disabled and there is no access to oneWeigh.
Appendix F – Citrix Virtual Memory Optimization
Citrix contains a Virtual Memory Optimization utility that can cause Btrieve 8020 errors and error zeros when launching AGRIS. To minimize this problem, disable the Citrix Virtual Memory Optimization service. To disable the Citrix Virtual Memory Optimization service:
- On the Citrix server, click Start >> (Settings) >> Control Panel >> Administrative Tools >> Services.
- Double-click Citrix Virtual Memory Optimization.
- Change the Startup Type to Disabled.
- Click Stop to change the service status to Stopped. AGRIS should now launch properly.
Note: If the Btrieve 8020 error still occurs, uninstall Pervasive PSQL, then reinstall it.
Appendix G – Setting the TCP Ports
A firewall is recommended for any organization using high-speed internet access to help prevent unauthorized inbound connections (intrusions) from the internet into a local network. There are 2 types of firewalls: hardware and software. A software firewall is an application that runs on an individual computer while a hardware firewall is a physical device, such as a router, that provides firewall capabilities. Greenstone recommends the use of a hardware firewall to secure the network. No special configuration should be required to allow access to AGRIS when using a hardware firewall as AGRIS does not run across the internet (remote locations access AGRIS via Citrix/Terminal Server so those ports do need to be open).
Some organizations may also wish to utilize a software firewall, such as Windows Firewall, in addition to a hardware firewall. Here is a listing of the primary ports that must be opened on a software firewall in order to allow access to AGRIS:
Primary Ports:
Pervasive: 1583 and 3351 (TCP)
DNS: 53 (UDP, TCP)
COM+ (a.k.a. Enterprise Services): 135 (TCP) + random ports between 1024-65534 (TCP)*
Additional ports that may be required depending upon the system configuration:
Terminal Services: 3389 (TCP)
Citrix: 1494 (TCP)
FTP: 21 (TCP)
*By default, COM+ utilizes a large range of ports (TCP: 1024-65534). It is possible to configure a smaller port range for COM by completing the following steps:
- Go to Start > Settings > Control Panel > Administrative Tools > Component Services
- Double-click on Component Services > Computers
- Right-click on My Computer and go to Properties
- Click on the Default Properties tab
- Highlight Connection-oriented TCP/IP and click Properties
- For the Port range assignment and Default dynamic port allocation options, move the radio buttons to Intranet range
- Remove the existing entries by clicking the Remove All button
- Enter in the desired port range using the following format: 5000-5020
- NOTE: Enter in the port range with no spaces and a hyphen separating the 2 numbers. The example shown above would restrict COM to using a range of 21 ports between 5000 and 5020. This number of ports should work successfully for most networks running AGRIS. It may be necessary to implement a larger port range in certain environments, though it is unlikely that COM would ever need to access more than 100 ports.
- Click Add > OK > OK to save the changes from the previous step
- Reboot the computer to ensure the changes are successfully applied
- Adjust the software firewall settings to allow inbound connections to the port range specified above
Please consult the Microsoft website (http://www.microsoft.com) for additional information regarding limiting the range of ports used by COM+ Applications.
Setting up a port range in Component Services: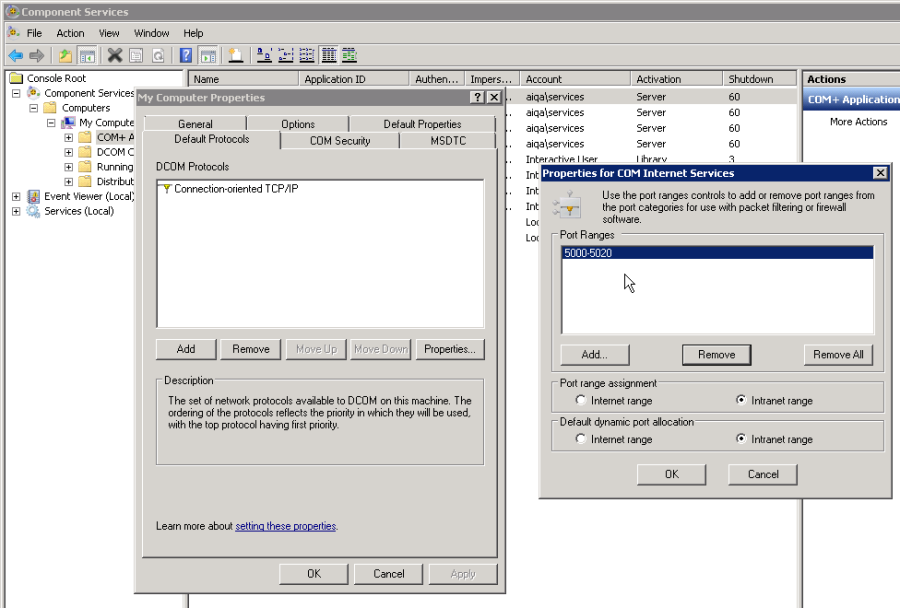
Configuration of the Windows Firewall showing explicitly defined inbound rules for the primary ports discussed previously: 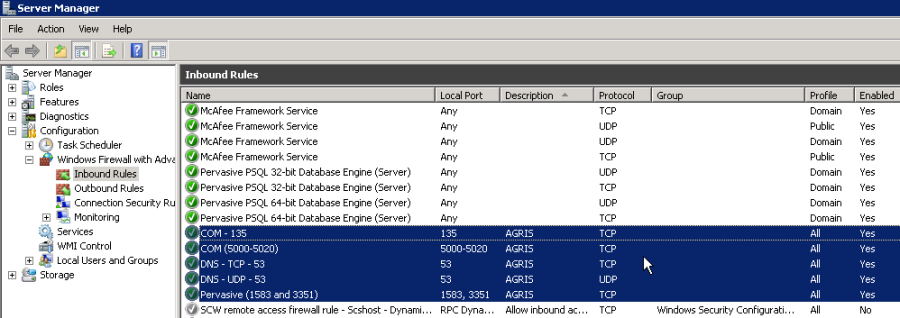
Appendix H: Tips, Known Issues, and Best Practices
The following is a list of tips, known issues, and best practices for installing or upgrading to more recent Microsoft operating systems, Pervasive® PSQL™, and AGRIS 20.2.0.
Pervasive® PSQL™
| If you are upgrading from Pervasive PSQL v8.X, uninstall that version of PSQL before installing a version supported by the new version of AGRIS. |
| If you already use Pervasive Back-up Agent™, you must purchase Back-up Agent 2.0 for use with Pervasive® PSQL™ v11 or v12. See the Pervasive web site for details. |
| NOTE: The Create File Version and the Limit Segment Size settings discussed in this section are applied automatically as part of the AGRIS install when you allow the system to apply optimization changes towards the end of the installation routine. The information below is provided for reference only. |
| When converting datasets with split files (files that have split to .^01 or more on the files), there is a possibility of overloading the Transaction Log file size allocation for files in that dataset. Uncheck the Limit Segment Size to 2GB option in the Pervasive® PSQL™ Control Center Workstation Properties window. |


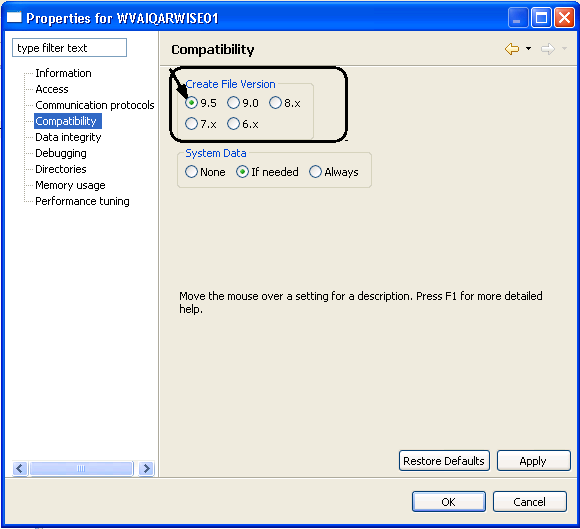
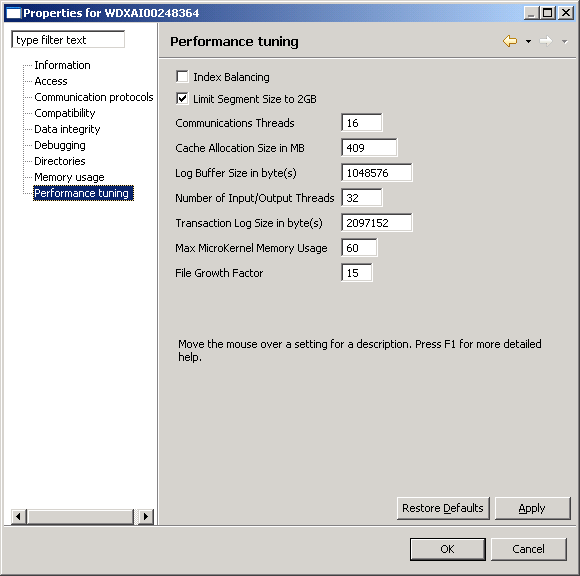
RetailWise
| RetailWise customers cannot upgrade directly to this version of AGRIS and must coordinate their upgrade to Store Manager ES and AGRIS 20.2.0 with the Sales Team (800-393-0075). The AGRIS Integration Platform (AIP) for RetailWise, which is translates data between RetailWise and AGRIS, is not supported in AGRIS 9.5.0.7 and higher. Note that customers already running Store Manager ES are not impacted by this and are able to upgrade to AGRIS 20.2.0. |
| If upgrading to Pervasive® PSQL™ v10 or greater, instead of uninstalling the previous version and installing the new version: |
| If the .db file format is incompatible or corrupt, you may receive a *Btrieve 46 error (access to file denied). This error could also affect any of the *.db files in the C:\Retailwise\Vertical folder. |
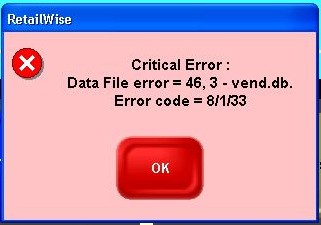
Microsoft Operating Systems
Windows Server® 2012 R2, 2016, 2019
| You cannot apply an Auto Update to a Windows Server 2012 R2, Windows Server 2016, nor Windows Server 2019 machine. All Service Pack installations must be carried out manually, while logged in as an Administrator. |
| If you need to set up an ODBC connection for Junge® Automated Blenders in a 64-bit environment, you will need to open the ODBC setup via C:\Windows\SysWOW64\odbcad32.exe. The ODBC setup that opens through the Windows Control Panel (C:\Windows\System32\odbcad32.exe) has only one option (SQL Server). |
| Changing the color scheme from the Windows Server 2008 basic color scheme to either the Standard or Classic color scheme may cause some disabled AgroGuide fields to appear as though they are available. |
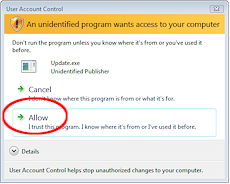
Dataset Conversions
| Start all conversions on the Database server. |
| The Database Conversion utility creates a log entry for the conversion of each package in the dataset. |
| On workstations where both AGRIS and Fuel Connect™ are installed, you must stop the Fuel Connect service before upgrading AGRIS. |
| When transferring data between datasets using either the DTR process or Imports, ensure that both datasets are already converted to AGRIS 20.2.0 before starting the transfer process. |
| When validating datasets prior to conversion, a File not Found or Package not Found entry may appear in the error log. While this does not prevent the conversion process from running, you may need to rebuild some dataset files following the conversion. If necessary, call the Technical Assistance Center (800-366-2474) for further assistance. |
| If you receive an Auto Blender Log cannot create session message, it indicates that an invalid login attempt occurred for an auto blender. |
| AgroGuide Data Scrub: This conversion automatically corrects any Farm, Field, or Crop Zone codes that end with characters other than 0-9, a-z or A-Z. |
Optimization Settings
There are three areas covered by the Optimization Settings:
Recommended Settings for Pervasive PSQL
Clicking Yes on the Optimization Settings prompt will apply the recommended settings for AGRIS for the Pervasive PSQL installation on the local machine. There are recommended settings for the Client, Server, and Workgroup installation types
Clicking No on the Optimization Settings prompt will not apply the recommended settings; your Pervasive PSQL settings will remain the same.
The details of the recommended settings are below.
PSQL Server:
Allow Cache Engine Connections - No
Compatibility > Create File Version - 9.5
Limit Segment Size to 2GB - No
Connection Timeout - 30
Communication Protocols - TCP/IP only
Use Cache Engine - No
Runtime Server Support - No
PSQL Client:
Use Local Microkernel Engine - No
Connection Timeout - 30
Communication Protocols - TCP/IP only
Use Cache Engine - No
Runtime Server Support - No
PSQL Workgroup:
Allow Cache Engine Connections - No
Create File Version - 9.5
Limit Segment Size to 2GB - No
Connection Timeout - 30
Communication Protocols - TCP/IP only
Use Cache Engine - No
Runtime Server Support - No
Server Message Block (SMB) set to version 1.
SMB is an operating system setting related to file access. By default, some of the operating systems supported by AGRIS have the SMB version set to version 2 or greater. AGRIS requires SMB version 1.
The Optimization Settings process will set the SMB setting to version 1 when the Pervasive Workgroup or Pervasive Server is installed. As it is a mandatory setting for AGRIS, it will be set to 1 for both Yes and No answers to the Optimization Settings prompt.
COM+ Error Reporting Enabled
The Optimization Settings process enables error reporting for COM+. It will be enabled for both Yes and No answers to the Optimization Settings prompt.
Warning Messages in Event Viewer
After installing AGRIS there may be a series of Warning messages in the Windows Event Viewer with a Source of Complus. These are expected warning messages and are not a cause for concern. See the example screenshot below: 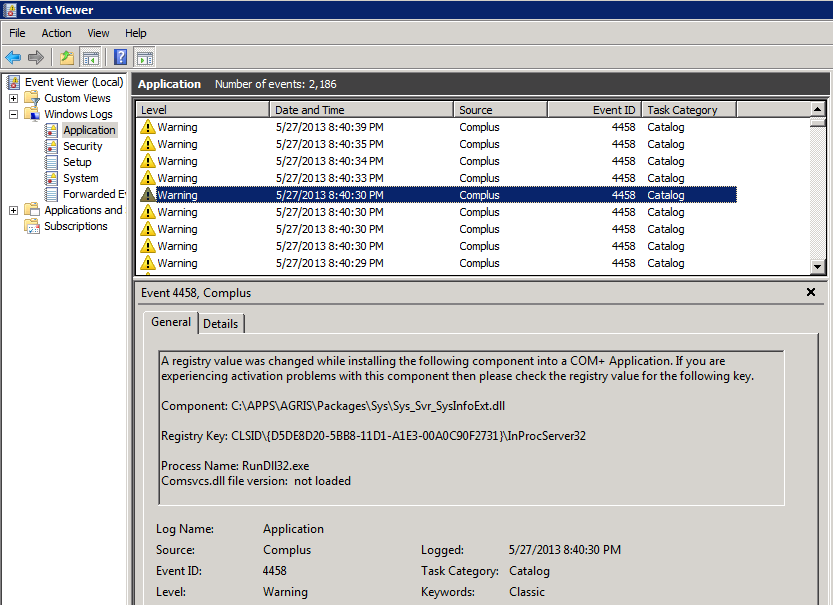
Installation Log Files
The log files created by the AGRIS installation are located in the following folders. These log files are helpful for troubleshooting any problems that may occur during the installation process.
For 64-bit computers: C:\Program Files (x86)\AGRIS\TEMP\
For 32-bit computers: C:\Program Files\AGRIS\TEMP\
Click here to go back to the Technical Info page
Related Content
This bulletin contains proprietary and confidential information owned by Cultura Technologies, LLC and which is subject to laws, regulations, and treaties and the provisions of your Cultura Technologies, LLC license agreement. Any copying, dissemination, or use of this bulletin or its contents without prior written consent from Cultura Technologies, LLC is expressly prohibited.
Related content
 ✦
✦ ✦
✦ ✦
✦
3820 Mansell Road, Suite 350 ✦ Alpharetta, GA 30022 ✦ www.GreenstoneSystems.com
© 2011 - 2024 Cultura Technologies LLC. All Rights Reserved Worldwide. Products and company names mentioned herein may be trademarks or registered trademarks of their respective owners.